지난 포스팅에서 트리 구조의 이론적인 부분을 학습하였다. 이제 그 이론을 바탕으로 이진 트리를 Javacript언어로 구현하려고 한다.
이진 트리를 구현하는 방법론
이진 트리를 구현하는 방법은 두 가지가 있다.
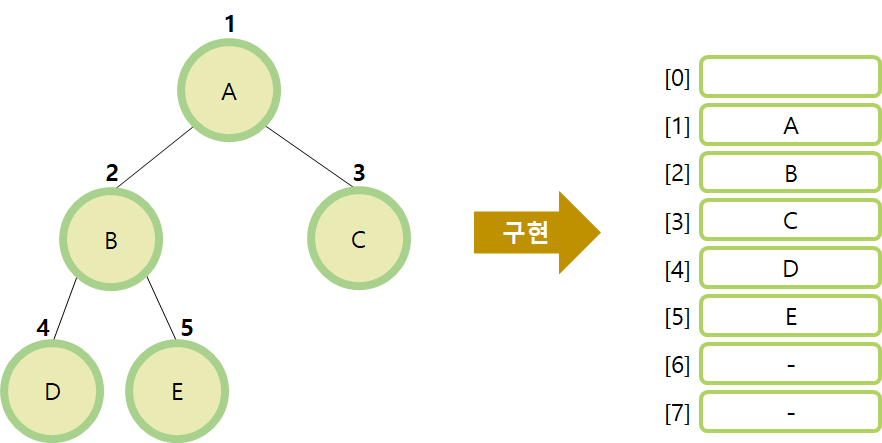
1. Array(배열)를 이용하는 방법

노드에 번호를 부여하고 그 번호에 해당하는 값을 인덱스 번호로 활용한다. 따라서 배열을 첫 번째 요소인 인덱스 0 직관화를 위해 비워둔다.
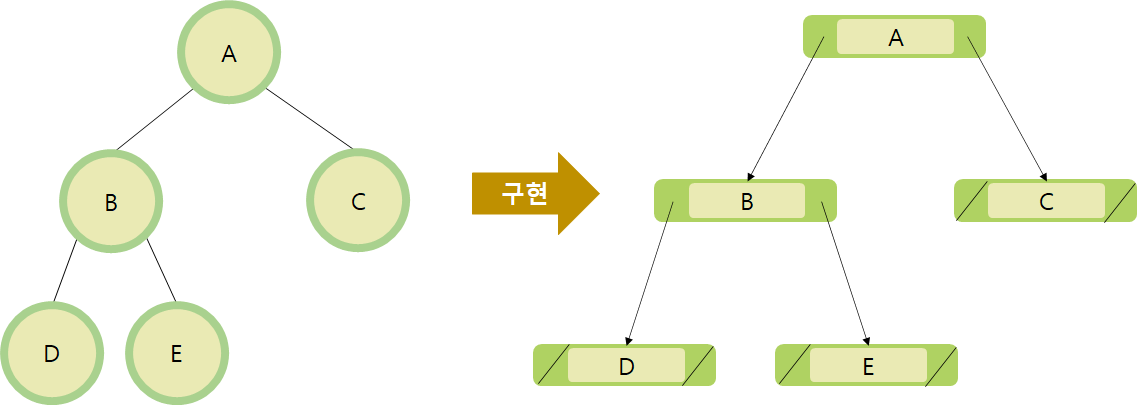
2. Linked List(연결 리스트)를 이용하는 방법

Linked List(연결 리스트)기반으로 왼쪽 링크와 오른쪽 링크에 자식 노드를 연결하는 방법이다. 연결 리스트 구조 자체가 트리 구조와 일치 하기 때문에 굉장히 직관적인 이해가 가능하다. 이 방법으로 트리 구조를 구현하는 것은 굉장히 좋은 구현이라고 할 수 있다.
이진 탐색 트리(Binary Search Tree)의 정의
모든 노드에는 최대 2개의 자식 노드가 있고 각 노드의 값(부모)이 왼쪽 노드 값(자식)보다 커야하고 오른쪽 노드 값(자식)보다 작아야 한다.

Javascript를 이용한 이진 탐색 트리(Binary Search Tree) 구현
위에서 언급한 것처럼 연결 리스트를 이용한 방법이 더욱 직관적이기 때문에 이진 트리 구조를 연결 리스트 구조로 구현할 생각이다.
1. treeNode 클래스를 만들어 노드의 뼈대를 만들어준다.
class treeNode {
  constructor(data) {
    this.data = data;
    this.left = null;
    this.right = null;
  }
}
2. insertNode 클래스를 만들어 root를 설정해준다.
class insertNode {
  constructor() {
    this.root = null;
  }
}
3. insertNode 클래스에 insert() 메서드를 넣어준다.
insert(data) {
    let node = new treeNode(data);

    if(!this.root) {
      this.root = node;
      return this;
    }

    let current = this.root;
    while (current) {
      if(data === current.data) {
        return;
      }

      if(data < current.data) {
        if(!current.left) {
          current.left = node;
          break;
        }
        current = current.left;
      }

      if(data > current.data) {
        if(!current.right) {
          current.right = node;
          break;
        }
        current = current.right;
      }
    }
  }
4. 결과
let nums = new insertNode();
nums.insert(10);
nums.insert(5);
nums.insert(11);
nums.insert(3);
nums.insert(6);

console.log(nums)
// insertNode {
//   root: treeNode {
//     data: 10,
//     left: treeNode { data: 5, left: 3, right: 6 },
//     right: 11
//   }
// }
5. 전체 코드
class treeNode {
  constructor(data) {
    this.data = data;
    this.left = null;
    this.right = null;
  }
}

class insertNode {
  constructor() {
    this.root = null;
  }

  insert(data) {
    let node = new treeNode(data);

    // 루드가 설정되어 있지 않다면 루트를 node로 만들어 준다. node는 treeNode()에서 뼈대를 받아온다.
    if(!this.root) {
      this.root = node;
      return this;
    }

    // 비교를 위해 current 를 설정해 준다.
    let current = this.root;

    // current가 true 라면 while문을 돌면서 data와 지금 현재 data인 current data를 비교한다.
    while (current) {
      // 중복된 값은 어떤 결과를 리턴하지 않는다.
      if(data === current.data) {
        return;
      }
      // data가 current data(기준) 보다 작다면 왼쪽에 넣어준다.
      if(data < current.data) {
        if(!current.left) {
          current.left = node;
          break;
        }
      // 이제 current data(기준)는 왼쪽의 data로 준다.
        current = current.left;
      }
      // data가 기준 data(current data) 보다 크다면 오른쪽에 넣어준다.
      if(data > current.data) {
        if(!current.right) {
          current.right = node;
          break;
        }
        // 이제 current data(기준)는 오른쪽 data로 준다.
        current = current.right;
      }
    }
  }
}

let nums = new insertNode();
nums.insert(10);
nums.insert(5);
nums.insert(11);
nums.insert(3);
nums.insert(6);


console.log(nums)
// insertNode {
//   root: treeNode {
//     data: 10,
//     left: treeNode { data: 5, left: 3, right: 6 },
//     right: 11
//   }
// }
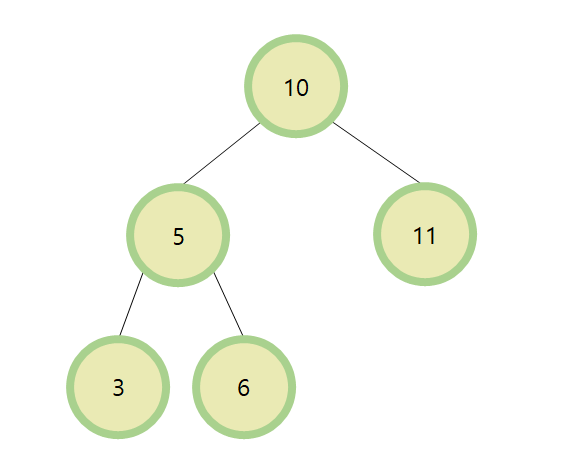
6. 코드로 작성된 트리 도식화

'학습노트 > 자료구조' 카테고리의 다른 글
| [JavaScript] Quick Sort(퀵 정렬) (2) | 2020.09.03 |
|---|---|
| [JavaScript] Tree(트리) - Depth-first Search(깊이 우선 탐색), Breadth-first Search(너비 우선 탐색) (0) | 2020.08.26 |
| [JavaScript] Tree(트리) - 이론학습 (0) | 2020.08.25 |
| [JavaScript] Queue - Linear Queue(선형 큐) (0) | 2020.08.25 |
| [JavaScript] Stack(스택) (0) | 2020.08.25 |


